Table of Contents
If you want a VPN server and you don't want to invest a lot of money into a dedicated hardware - you can use your router! As long as it supports Tomato firmware, you don't need anything else. If you don't have a Tomato firmware yet, you can get it here: Tomato firmware download. Just keep in mind, that you need to install the VPN version. Once you install it (for install instruction click here), you are ready to set up your Tomato OpenVPN server.
Non standard subnet and IP
If you didn't change anything after Tomato install, you're probably using a standard: 192.168.1.1 subnet. Well just change it. It's really common and if you set up a VPN with this, you'll end up having conflicts with other subnets with same IP addresses.
Go to Basic > Network tab and change settings in LAN section.
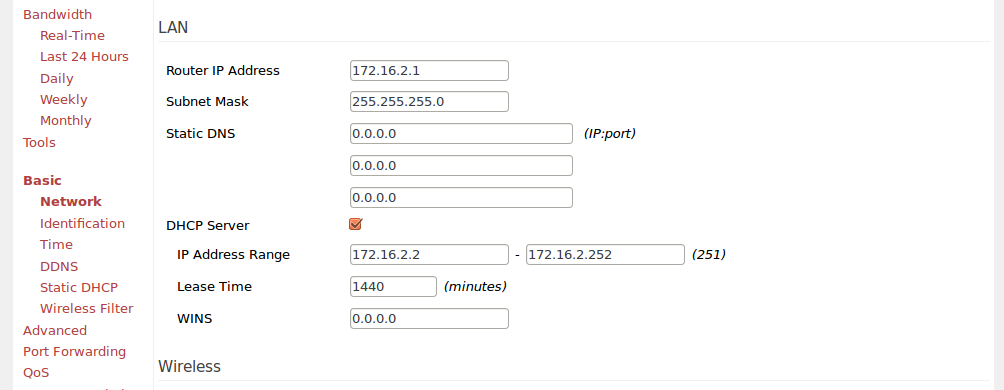
That way you won't have any conflicts and you will be able to use your VPN network together with your standard internet connection.
Tomato VPN server basic settings
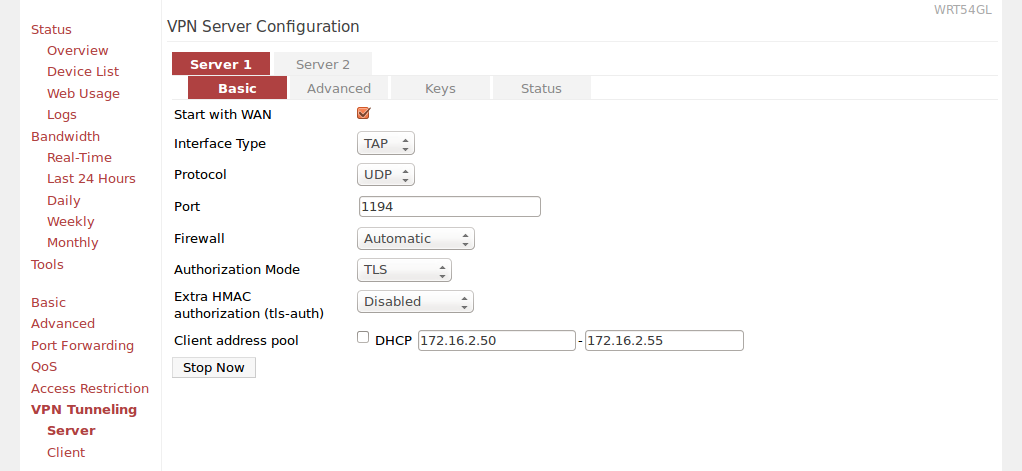
Now go to VPN Tunneling > Server > Basic settings page and:
- Check "Start with WAN"
- Interface type: TAP
- Protocol: UDP
- Port: 1194
- Firewall: Automatic
- Authorization model: TLS
- Extra HMAC authorization (tls-auth): Disabled
- Uncheck DHCP and provide IP range manually
Tomato VPN server advanced settings
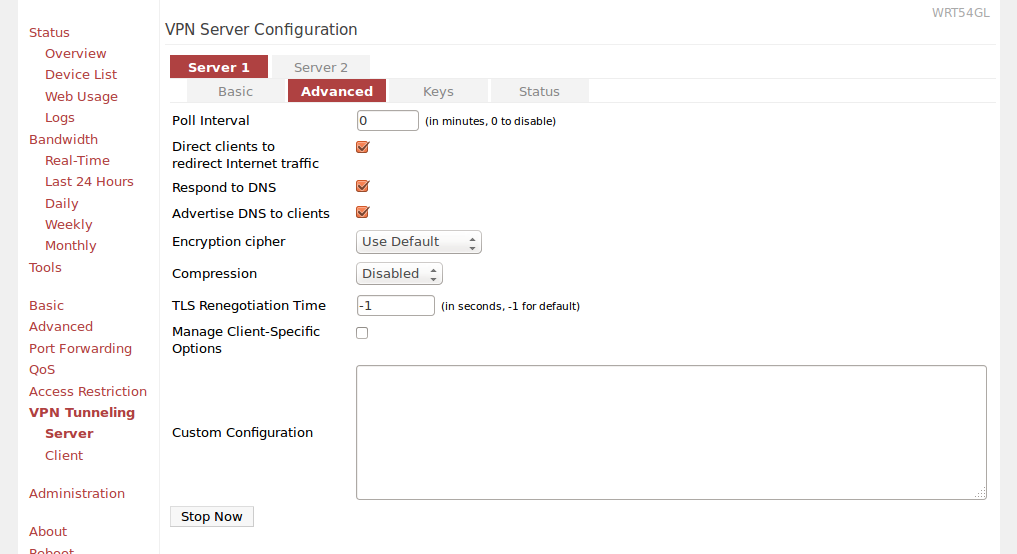
Next you have to go to Advanced tab and:
- Poll Interval: 0
- Direct clients to redirect Internet traffic - Checked
- Respond to DNS - Checked
- Advertise DNS to clients: Checked
- Encryption cipher: Use Default
- Compression: Disabled
- TLS Renegotiation Time: -1
- Manage Client-Specific Options: Unchecked
- Custom Configuration: Leave blank
 Setting up VPN keys
I found this part to be the hardest. Mostly because I didn't want to read the whole README and all the instructions. Also all the tutorials were outdated. I had to figure it all by myself ;) but you'll see in a second that it's not hard at all (once you know what to do).
First of all, in order to use VPN you need following elements:
| Filename | Required by | Description | Private |
| ca.crt | All | Root CA certificate (Certificate Authority) | NO |
| ca.key | key signing machine only | Root CA key (used to sign all the certificates) | YES |
| dh.pem | Server | Diffie Hellman parameters | NO |
| server.crt | Server | Server certificate | NO |
| server.key | Server | Server key | YES |
| client.crt | Client | Client certificate | NO |
| client.key | Client | Client key | YES |
Getting tne EasyRSA and setting it up
You can generate all of them using the EasyRSA library (you can find it here). First you need to clone the repository to your local machine:
cd ~
git clone git@github.com:OpenVPN/easy-rsa.git
cd easy-rsa/easyrsa3
Note: if you get following message when running above command:
Permission denied (publickey).
fatal: Could not read from remote repository.
Please make sure you have the correct access rights and the repository exists.
Go to https://github.com/OpenVPN/easy-rsa and just download the zip file with the source code (the message itself means that you don't have a github account set up in a proper way). Unzip it somewhere and follow the rest of instructions.
Now you need to copy vars.example file to a vars file. Edit it and set up following options according to where and who you are:
set_var EASYRSA_REQ_COUNTRY	"PL"
set_var EASYRSA_REQ_PROVINCE "Malopolska"
set_var EASYRSA_REQ_CITY	"Cracow"
set_var EASYRSA_REQ_ORG     "SuperName"
set_var EASYRSA_REQ_EMAIL	"email"
set_var EASYRSA_REQ_OU		"Somename"
You may need to uncomment those options as well.
Generating CA cert
Now init pki and generate the ca.cert:
# from easyrsa3 dir
./easyrsa init-pki

Note: using Easy-RSA configuration from: ./vars

init-pki complete; you may now create a CA or requests.
Your newly created PKI dir is: /home/user/openvpn/easy-rsa/easyrsa3/pki
Next generate ca.cert:
./easyrsa build-ca

Note: using Easy-RSA configuration from: ./vars
Generating a 2048 bit RSA private key
.............................................................+++
...........................+++
writing new private key to '/home/user/openvpn/easy-rsa/easyrsa3/pki/private/ca.key'
Enter PEM pass phrase: PROVIDE PASSWORD HERE AND PRESS ENTER
Verifying - Enter PEM pass phrase: PROVIDE PASSWORD AGAIN

You are about to be asked to enter information that will be incorporated
into your certificate request.
What you are about to enter is what is called a Distinguished Name or a DN.
There are quite a few fields but you can leave some blank
For some fields there will be a default value,
If you enter '.', the field will be left blank.
-----
Common Name (eg: your user, host, or server name) [Easy-RSA CA]: PROVIDE A NAME YOU WANT

CA creation complete and you may now import and sign cert requests.
Your new CA certificate file for publishing is at:
/home/user/openvpn/easy-rsa/easyrsa3/pki/ca.crt
Now you have ca.crt and ca.key files. You should store ca.key somewhere safe - it must remain private. On the other hand - you will use ca.crt for both: your VPN server (Tomato) and your VPN clients.
Generating server key and server certificate
Once you have the "master" cert, it's time to generate your server key and server certificate:
./easyrsa build-server-full SERVERNAME

Note: using Easy-RSA configuration from: ./vars
Generating a 2048 bit RSA private key
......+++
..................+++
writing new private key to '/home/user/openvpn/easy-rsa/easyrsa3/pki/private/SERVERNAME.key'
Enter PEM pass phrase: PROVIDE A PASSWORD
Verifying - Enter PEM pass phrase:
-----
Using configuration from /home/user/openvpn/easy-rsa/easyrsa3/openssl-1.0.cnf
Enter pass phrase for /home/user/openvpn/easy-rsa/easyrsa3/pki/private/ca.key: CA PASSWORD

Check that the request matches the signature
Signature ok
The Subject's Distinguished Name is as follows
commonName            :PRINTABLE:'SERVERNAME'
Certificate is to be certified until Jul 17 14:55:45 2024 GMT (3650 days)

Write out database with 1 new entries
Data Base Updated
Removing a password from server key
This is the only tricky part. Now that you have almost all the files that you need, you could try uploading them to a proper section in Tomato VPN settings and running a server. Unfortunately you will end up with following (or similar) message:
daemon.warn openvpn[2263]: NOTE: OpenVPN 2.1 requires '--script-security 2' or \
  higher to call user-defined scripts or executables
daemon.notice openvpn[2263]: Diffie-Hellman initialized with 2048 bit key
daemon.warn openvpn[2263]: WARNING: this configuration may cache passwords \
  in memory -- use the auth-nocache option to prevent this
daemon.warn openvpn[2263]: Cannot load private key file server.key: \
  error:0907B068:lib(9):func(123):reason(104): error:140B0009:lib(20):func(176):reason(9)
daemon.err openvpn[2263]: Error: private key password verification failed
daemon.notice openvpn[2263]: Exiting
It's because you've uploaded a key that is password protected and you don't have a input box or any other place where you could provide this password. On the other hand, you can't generate a server key and server certificate without a password. Leaving it blank will cause a following error:
UI_set_result:result too small:ui_lib.c:869:You must type in 4 to 1024 characters
PEM routines:PEM_def_callback:problems getting password:pem_lib.c:111:
PEM routines:DO_PK8PKEY:read key:pem_pk8.c:130:

Easy-RSA error:

Failed to generate request
So now, you need to generate new key that doesn't require a password, based on the server key you already have:
cd pki/private
openssl rsa -in SERVERNAME.key -out SERVERNAME_nopass.key
Enter pass phrase for SERVERNAME.key: SERVER KEY PASSWORD
writing RSA key
Generating Diffie Hellman parameters
From easyrsa3 dir:
# This will take some time
./easyrsa gen-dh
Note: using Easy-RSA configuration from: ./vars
Generating DH parameters, 2048 bit long safe prime, generator 2
This is going to take a long time
........................+..................
# a lot of dots ;)
DH parameters of size 2048 created at /home/user/openvpn/easy-rsa/easyrsa3/pki/dh.pem
VPN Server Configuration - Keys tab
Now we have all the files that we need in order to execute our OpenVPN Tomato based server. Copy the appropriate files into given fields:
- Certificate Authority - /home/user/openvpn/easy-rsa/easy-rsa3/pki/ca.crt
- Server Certificate - /home/user/openvpn/easy-rsa/easy-rsa3/pki/issued/SERVERNAME.crt - copy just the BEGIN/END CERTIFICATE part
- Server Key - /home/user/openvpn/easy-rsa/easy-rsa3/pki/private/SERVERNAME_nopass.key
- Diffie Hellman parameters - /home/user/openvpn/easy-rsa/easy-rsa3/pki/dh.pem
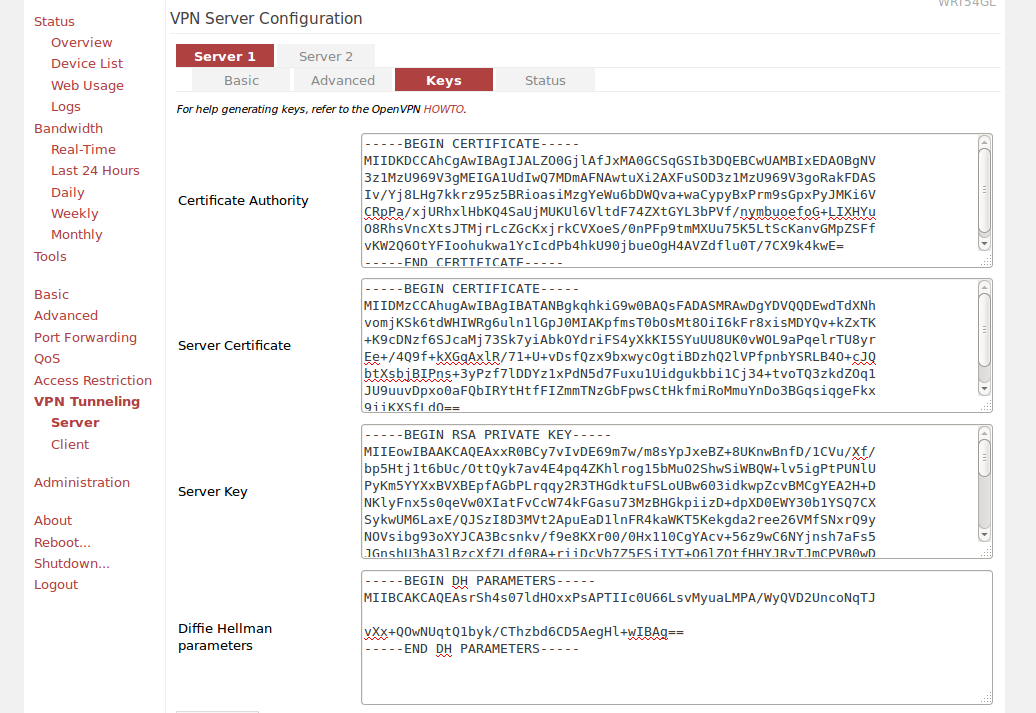
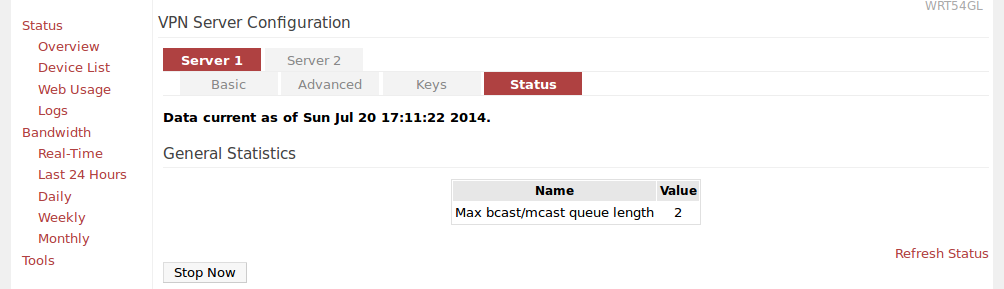
Once you copy content of all those files - you can just click Save and Start now. Your VPN server should be up! You can check its status when you click the Status tab:
Troubleshooting
If your server doesn't start, you can check what's going on by going to: Status > Logs page and selecting View Last 100 Lines option. There you should see details about your VPN server. It should help you out fixing your issue.
Generating client certificate and client key
Generating them is the same as generating server key and cert (just command is a bit different):
./easyrsa build-client-full CLIENTNAME

Note: using Easy-RSA configuration from: ./vars
Generating a 2048 bit RSA private key
...............+++
writing new private key to '/home/user/openvpn/easy-rsa/easyrsa3/pki/private/CLIENTNAME.key'
Enter PEM pass phrase: CLIENT PASSWORD
Verifying - Enter PEM pass phrase:
-----
Using configuration from /home/user/openvpn/easy-rsa/easyrsa3/openssl-1.0.cnf
Enter pass phrase for /home/user/openvpn/easy-rsa/easyrsa3/pki/private/ca.key:
Check that the request matches the signature
Signature ok
The Subject's Distinguished Name is as follows
commonName            :PRINTABLE:'CLIENTNAME'
Certificate is to be certified until Jul 17 15:21:08 2024 GMT (3650 days)

Write out database with 1 new entries
Data Base Updated
Note: Your client.crt will be located in easy-rsa/easyrsa3/pki/issued/ directory.
Once you've generated key and certificate you should give them (and ca.cert) to anyone that you want to share your VPN with.
Keep in mind, that each client requires a separate certificate and key.
September 25, 2014 — 09:31
Thanks, this guide was easy enough to follow compared to most that I’ve followed in the past. Got everything working fairly quicky.
December 4, 2014 — 19:54
What settings do I need on the client?
December 11, 2014 — 20:02
so I got this going… I can conenct the VPN but it’s not routing traffic. I can verify that I have an IP from the router for the tunnel 192.168.20.10.. but I cannot even ping the router at 192.168.20.1
what did I miss?
December 27, 2014 — 18:50
It depends on the client really…
December 27, 2014 — 18:51
there are routing settings for your client – try playing with them.
February 25, 2015 — 20:55
My apologies if this does not format correctly, hopefully the commented section will hold the format.
Here is how to set up the client’s myvpm.opvn file. Be aware because you are using the Client key in the config file, which should remain private, you should not send myvpm.opvn in email or other public spaces unencrypted. Make sure you save the file in UNIX format if you are using MacOS or Ios. I have gotten his to work with the Viscosity vpnclient on the mac and OpenVPN vpnclient on Ios. It should work with Android and Windows. Modify then name the text below myvpm.opvn, then save and import the file into your vpnclient app. I recommend you remove comments before saving.
client
dev tun
proto udp
# remote DOMAIN NAME OR IP OF YOUR VPN SERVER 1196 udp
# Example:
remote vpn.someplace.net 1194 udp
resolv-retry infinite
nobind
persist-key
persist-tun
# If you set Advanced > Compression to Adaptive, uncomment the following line:
# comp-lzo
verb 4
# Router LAN IP Addresses range
# route SUBNET SUBNETMASK
# Example:
route 192.168.1.0 255.255.255.0
#/home/user/openvpn/easy-rsa/easy-rsa3/pki/ca.crt
—–BEGIN CERTIFICATE—–
…
—–END CERTIFICATE—–
#/home/user/openvpn/easy-rsa/easy-rsa3/pki/issued/CLIENTNAME.crt
# Bottom section only.
—–BEGIN CERTIFICATE—–
…
—–END CERTIFICATE—–
#/home/user/openvpn/easy-rsa/easy-rsa3/pki/private/CLIENTNAME.key
—–BEGIN ENCRYPTED PRIVATE KEY—–
…
—–END ENCRYPTED PRIVATE KEY—–
March 12, 2015 — 15:35
Did you try PureVPN?
June 11, 2015 — 23:27
I know this discussion is a few months old, but I’m hoping you can help. I followed your directions, but my VPN fails to start up. All that I get in the log is this:
Asus-Tomato user.info init[1]: VPN_LOG_ERROR: 560: Adding tunnel interface to bridge failed…
Asus-Tomato user.info kernel: br0: port 3(tap21) entering disabled state
Any advice on how to debug this problem further? Is there a way to increase the log level to get more info?
June 11, 2015 — 23:46
Never mind. I rechecked all the keys and found that one of them was not the right one. After I fixed it, the VPN started up.
June 12, 2015 — 08:19
Why VPN is so difficult to setup for a layman. I think it should be easy for non technical users. Well i have some providers list that is not so much hard and everyone can setup easily @ vpnranks
July 14, 2015 — 08:10
I pick VPN from PureVPN for my router. Their VPN service works great and available 5 multi logins at a time. VPN router setup guide also available on their website http://www.purevpn.com/vpn-service/router-vpn.php
November 25, 2015 — 07:58
there is no vpn settings in my tomato 1.28, under access restrictions is just administrative control. no vpn. what gives
December 11, 2015 — 11:40
you need to have a tomato version that supports vpn. I wrote about that: ” that you need to install the VPN version”
July 8, 2016 — 21:17
I’ve been using Private Internet Access for a while now and it’s satisfactory, though it could have had more servers in more countries. But I can’t argue with the price.
I’ve also used Astrill and ExpressVPN.
I don’t like Astrill’s privacy policy (it even wants your personal info to sign up), and I used ExpressVPN for a month, it wasn’t faster than PIA.
1st priority = actual privacy
2nd = speed
Do you have any recommendations?
August 17, 2016 — 15:04
could you give me a head start for the routing setting on tomato please or if you could suget a link would be great.
October 10, 2016 — 13:45
Nice Information , I have to say that for the last few of hours i have been hooked by the impressive articles on this website. Keep up the wonderful work.
December 14, 2016 — 12:20
For my router i have been using PIA VPN and i has always perform very well. PIA has 30+ server and mostly are of USA.
https://vpnslab.com/private-internet-access-review/
July 15, 2017 — 03:40
ok I have a vpn service through a website https://www.defiance-vpn.com/ and the set up on my pc is through and with SoftEther. Now I have an AdvancedTomato Asus router with VPN settings. I was wondering what things do I need to make the current vpn service I have work with my AT router so my whole house can use the vpn? like do I need any specific files from the vpn service? or a way to use SoftEther with a Advanced Tomato vpn? any help is appreciated.