We decided to blacklist every country except Poland and USA. Full list of countries and their appropriate codes can be found here. Of course instead of whitelisting you could always blacklist:
This code won't block anything. It will just assign a yes/no value to a $geoip_country_code variable. You can then use it in your server block to allow/disallow access to certain parts of your application:
server {
  server_name  www.yourdomain.com;
  client_max_body_size 32M;
  keepalive_timeout 5;

  # Some other settings here

  error_page 403 /403.html;

  location /admin {
    if ($allowed_country = no) {
      return 403;
    }

    if (-f $request_filename) {
      break;
    }

    if (!-f $request_filename) {
      proxy_pass proxypasstargetsomewhere;
      break;
    }
  }
}
If you want a VPN server and you don't want to invest a lot of money into a dedicated hardware - you can use your router! As long as it supports Tomato firmware, you don't need anything else. If you don't have a Tomato firmware yet, you can get it here: Tomato firmware download. Just keep in mind, that you need to install the VPN version. Once you install it (for install instruction click here), you are ready to set up your Tomato OpenVPN server.
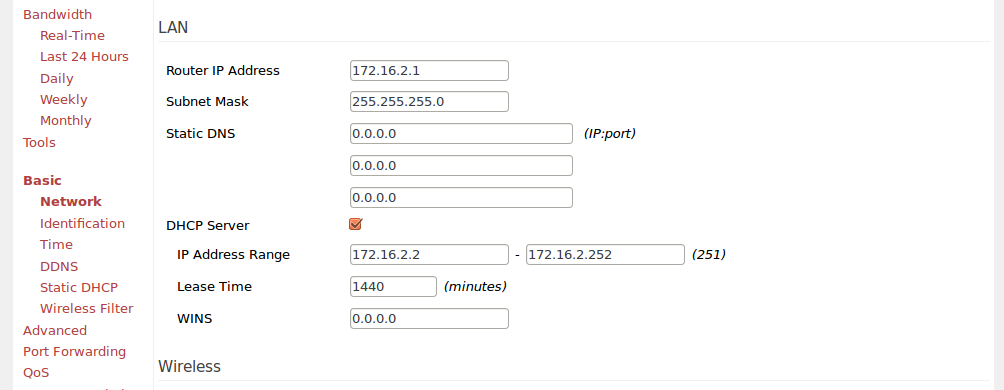
Non standard subnet and IP
If you didn't change anything after Tomato install, you're probably using a standard: 192.168.1.1 subnet. Well just change it. It's really common and if you set up a VPN with this, you'll end up having conflicts with other subnets with same IP addresses.
Go to Basic > Network tab and change settings in LAN section.
That way you won't have any conflicts and you will be able to use your VPN network together with your standard internet connection.
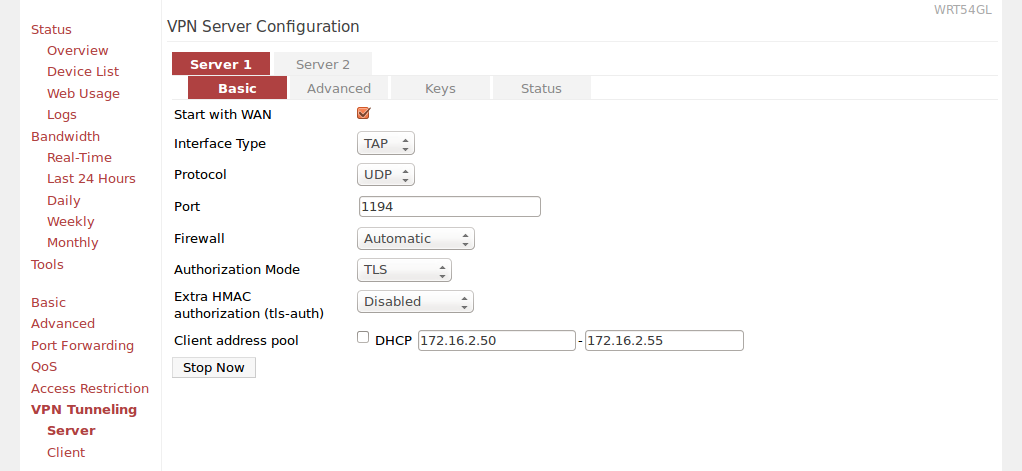
Tomato VPN server basic settings
Now go to VPN Tunneling > Server > Basic settings page and:
Check "Start with WAN"
Interface type: TAP
Protocol: UDP
Port: 1194
Firewall: Automatic
Authorization model: TLS
Extra HMAC authorization (tls-auth): Disabled
Uncheck DHCP and provide IP range manually
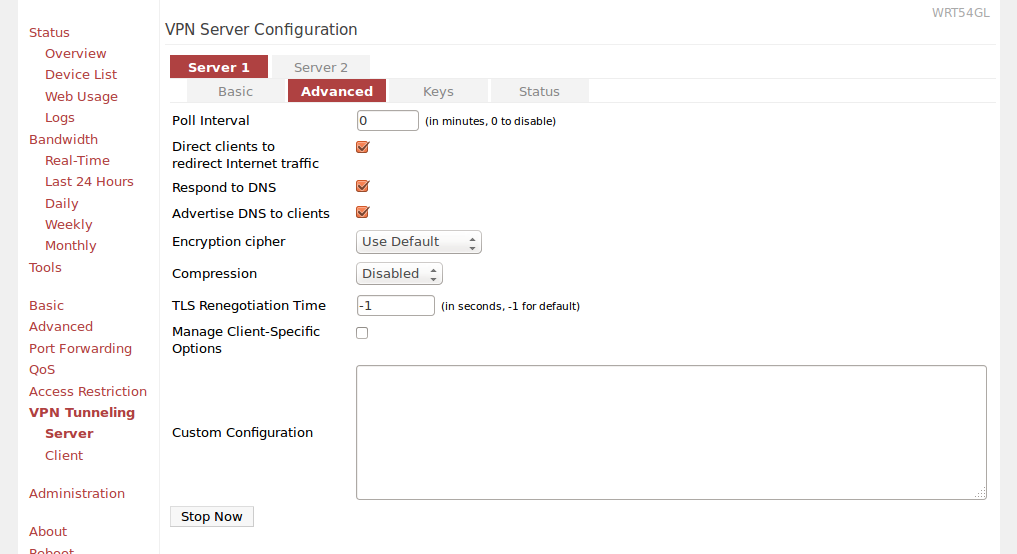
Tomato VPN server advanced settings
Next you have to go to Advanced tab and:
Poll Interval: 0
Direct clients to redirect Internet traffic - Checked
Respond to DNS - Checked
Advertise DNS to clients: Checked
Encryption cipher: Use Default
Compression: Disabled
TLS Renegotiation Time: -1
Manage Client-Specific Options: Unchecked
Custom Configuration: Leave blank
Setting up VPN keys
I found this part to be the hardest. Mostly because I didn't want to read the whole README and all the instructions. Also all the tutorials were outdated. I had to figure it all by myself ;) but you'll see in a second that it's not hard at all (once you know what to do).
First of all, in order to use VPN you need following elements:
Filename
Required by
Description
Private
ca.crt
All
Root CA certificate (Certificate Authority)
NO
ca.key
key signing machine only
Root CA key (used to sign all the certificates)
YES
dh.pem
Server
Diffie Hellman parameters
NO
server.crt
Server
Server certificate
NO
server.key
Server
Server key
YES
client.crt
Client
Client certificate
NO
client.key
Client
Client key
YES
Getting tne EasyRSA and setting it up
You can generate all of them using the EasyRSA library (you can find it here). First you need to clone the repository to your local machine:
cd ~
git clone git@github.com:OpenVPN/easy-rsa.git
cd easy-rsa/easyrsa3
Note: if you get following message when running above command:
Permission denied (publickey).
fatal: Could not read from remote repository.
Please make sure you have the correct access rights and the repository exists.
Go to https://github.com/OpenVPN/easy-rsa and just download the zip file with the source code (the message itself means that you don't have a github account set up in a proper way). Unzip it somewhere and follow the rest of instructions.
Now you need to copy vars.example file to a vars file. Edit it and set up following options according to where and who you are:
# from easyrsa3 dir
./easyrsa init-pki

Note: using Easy-RSA configuration from: ./vars

init-pki complete; you may now create a CA or requests.
Your newly created PKI dir is: /home/user/openvpn/easy-rsa/easyrsa3/pki
Next generate ca.cert:
./easyrsa build-ca

Note: using Easy-RSA configuration from: ./vars
Generating a 2048 bit RSA private key
.............................................................+++
...........................+++
writing new private key to '/home/user/openvpn/easy-rsa/easyrsa3/pki/private/ca.key'
Enter PEM pass phrase: PROVIDE PASSWORD HERE AND PRESS ENTER
Verifying - Enter PEM pass phrase: PROVIDE PASSWORD AGAIN

You are about to be asked to enter information that will be incorporated
into your certificate request.
What you are about to enter is what is called a Distinguished Name or a DN.
There are quite a few fields but you can leave some blank
For some fields there will be a default value,
If you enter '.', the field will be left blank.
-----
Common Name (eg: your user, host, or server name) [Easy-RSA CA]: PROVIDE A NAME YOU WANT

CA creation complete and you may now import and sign cert requests.
Your new CA certificate file for publishing is at:
/home/user/openvpn/easy-rsa/easyrsa3/pki/ca.crt
Now you have ca.crt and ca.key files. You should store ca.key somewhere safe - it must remain private. On the other hand - you will use ca.crt for both: your VPN server (Tomato) and your VPN clients.
Generating server key and server certificate
Once you have the "master" cert, it's time to generate your server key and server certificate:
./easyrsa build-server-full SERVERNAME

Note: using Easy-RSA configuration from: ./vars
Generating a 2048 bit RSA private key
......+++
..................+++
writing new private key to '/home/user/openvpn/easy-rsa/easyrsa3/pki/private/SERVERNAME.key'
Enter PEM pass phrase: PROVIDE A PASSWORD
Verifying - Enter PEM pass phrase:
-----
Using configuration from /home/user/openvpn/easy-rsa/easyrsa3/openssl-1.0.cnf
Enter pass phrase for /home/user/openvpn/easy-rsa/easyrsa3/pki/private/ca.key: CA PASSWORD

Check that the request matches the signature
Signature ok
The Subject's Distinguished Name is as follows
commonName            :PRINTABLE:'SERVERNAME'
Certificate is to be certified until Jul 17 14:55:45 2024 GMT (3650 days)

Write out database with 1 new entries
Data Base Updated
Removing a password from server key
This is the only tricky part. Now that you have almost all the files that you need, you could try uploading them to a proper section in Tomato VPN settings and running a server. Unfortunately you will end up with following (or similar) message:
daemon.warn openvpn[2263]: NOTE: OpenVPN 2.1 requires '--script-security 2' or \
  higher to call user-defined scripts or executables
daemon.notice openvpn[2263]: Diffie-Hellman initialized with 2048 bit key
daemon.warn openvpn[2263]: WARNING: this configuration may cache passwords \
  in memory -- use the auth-nocache option to prevent this
daemon.warn openvpn[2263]: Cannot load private key file server.key: \
  error:0907B068:lib(9):func(123):reason(104): error:140B0009:lib(20):func(176):reason(9)
daemon.err openvpn[2263]: Error: private key password verification failed
daemon.notice openvpn[2263]: Exiting
It's because you've uploaded a key that is password protected and you don't have a input box or any other place where you could provide this password. On the other hand, you can't generate a server key and server certificate without a password. Leaving it blank will cause a following error:
UI_set_result:result too small:ui_lib.c:869:You must type in 4 to 1024 characters
PEM routines:PEM_def_callback:problems getting password:pem_lib.c:111:
PEM routines:DO_PK8PKEY:read key:pem_pk8.c:130:

Easy-RSA error:

Failed to generate request
So now, you need to generate new key that doesn't require a password, based on the server key you already have:
cd pki/private
openssl rsa -in SERVERNAME.key -out SERVERNAME_nopass.key
Enter pass phrase for SERVERNAME.key: SERVER KEY PASSWORD
writing RSA key
Generating Diffie Hellman parameters
From easyrsa3 dir:
# This will take some time
./easyrsa gen-dh
Note: using Easy-RSA configuration from: ./vars
Generating DH parameters, 2048 bit long safe prime, generator 2
This is going to take a long time
........................+..................
# a lot of dots ;)
DH parameters of size 2048 created at /home/user/openvpn/easy-rsa/easyrsa3/pki/dh.pem
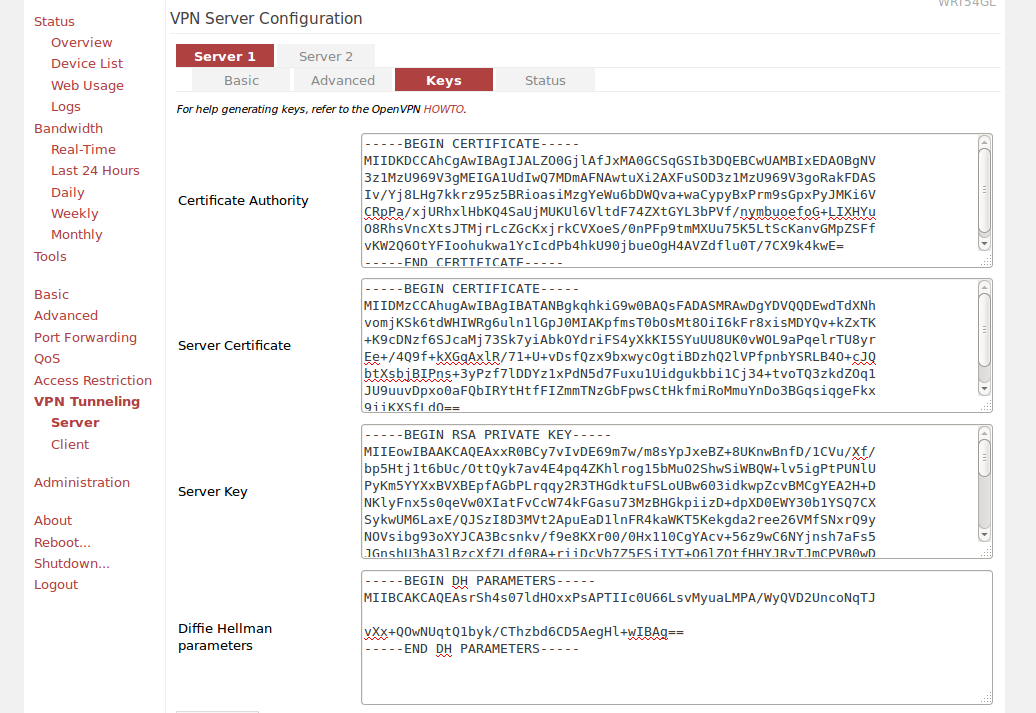
VPN Server Configuration - Keys tab
Now we have all the files that we need in order to execute our OpenVPN Tomato based server. Copy the appropriate files into given fields:
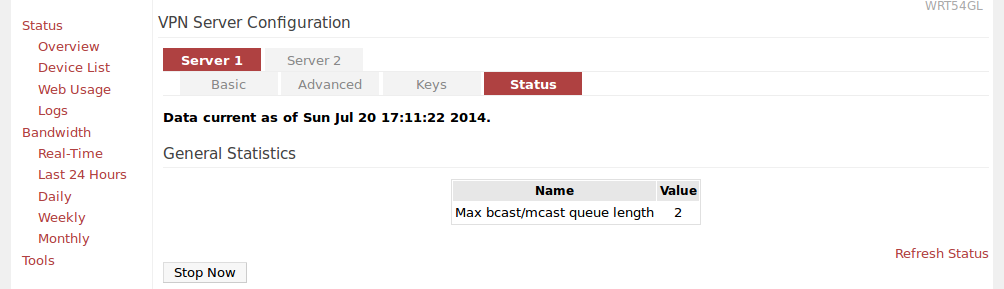
Once you copy content of all those files - you can just click Save and Start now. Your VPN server should be up! You can check its status when you click the Status tab:
Troubleshooting
If your server doesn't start, you can check what's going on by going to: Status > Logs page and selecting View Last 100 Lines option. There you should see details about your VPN server. It should help you out fixing your issue.
Generating client certificate and client key
Generating them is the same as generating server key and cert (just command is a bit different):
./easyrsa build-client-full CLIENTNAME

Note: using Easy-RSA configuration from: ./vars
Generating a 2048 bit RSA private key
...............+++
writing new private key to '/home/user/openvpn/easy-rsa/easyrsa3/pki/private/CLIENTNAME.key'
Enter PEM pass phrase: CLIENT PASSWORD
Verifying - Enter PEM pass phrase:
-----
Using configuration from /home/user/openvpn/easy-rsa/easyrsa3/openssl-1.0.cnf
Enter pass phrase for /home/user/openvpn/easy-rsa/easyrsa3/pki/private/ca.key:
Check that the request matches the signature
Signature ok
The Subject's Distinguished Name is as follows
commonName            :PRINTABLE:'CLIENTNAME'
Certificate is to be certified until Jul 17 15:21:08 2024 GMT (3650 days)

Write out database with 1 new entries
Data Base Updated
Note: Your client.crt will be located in easy-rsa/easyrsa3/pki/issued/ directory.
Once you've generated key and certificate you should give them (and ca.cert) to anyone that you want to share your VPN with.
Keep in mind, that each client requires a separate certificate and key.