
On March 9, 2025, many Chromecast 2nd generation and Chromecast Audio devices suddenly stopped working. Users like me could not cast content or set up their devices. This wasn't due to a software update or planned obsolescence, but most likely an expired device authentication certificate.
Disclaimer
USE THESE WORKAROUNDS AT YOUR OWN RISK
The information provided in this article is intended for educational purposes only. I am not affiliated with Google, and these workarounds have not been officially endorsed by Google or the manufacturers of your devices.
By following any instructions in this article:
- You acknowledge that you are modifying system settings beyond their intended use
- You accept full responsibility for any damage that may occur to your devices
- You understand that bypassing security features could potentially expose your devices to security risks
- You recognize that these are temporary solutions that may stop working at any time
I cannot and will not be held responsible for any damage, data loss, voided warranties, security breaches, or other negative consequences that may result from following these instructions. Always back up important data before making any changes to your devices.
These workarounds should be considered temporary measures until Google releases an official fix for the certificate expiration issue.
Credit and Additional Resources
Reddit user u/tchebb reached out to me after this article was published and shared his detailed technical investigation of this issue. Based on the publication timestamps, it's clear that he discovered and documented these solutions before my findings, though we used different investigative approaches to arrive at similar conclusions.
After discussing the situation, u/tchebb clarified:
Hey, nice work! I originally thought this was a repost of my research from yesterday, but after chatting I see we found the same settings pane though completely different methods: I worked backwards from the GMS device auth code, while you worked forward from dumpsys output and looked for hidden Cast-related settings. The other two things—the root cause of an expired certificate and the "change date/time" workaround—are both pretty clearly independent discoveries; I was just misled by that one thing. Looking at your blog, it's clear that you're not in the habit of cribbing other work, and this really does seem like a genuine coincidence (or LLM oversight).
I sincerely apologize for jumping on you like I did, and I'm happy we cleared it up over chat. Hopefully Google rolls a fix soon so neither of our work is needed anymore!
I want to be clear that u/tchebb's research preceded mine, and I acknowledge his priority in discovering these solutions. His post provides additional technical details about the root cause and includes several extra workarounds not covered in this article. If you're interested in understanding the technical details behind the certificate expiration or need alternative solutions for different devices, I highly recommend checking out his thorough research as the more comprehensive resource.
What Happened?
The certificate used by those devices was issued with a 10-year validity period. It was essential for the device authentication process to allow official Google apps to verify Chromecasts as genuine devices.
When a casting device (like a phone or computer) attempts to connect to a Chromecast, it checks the Chromecast's authentication certificate. With the expired intermediate CA, this verification fails, causing the casting process to be blocked.
What to Do If You've Factory Reset Your Device
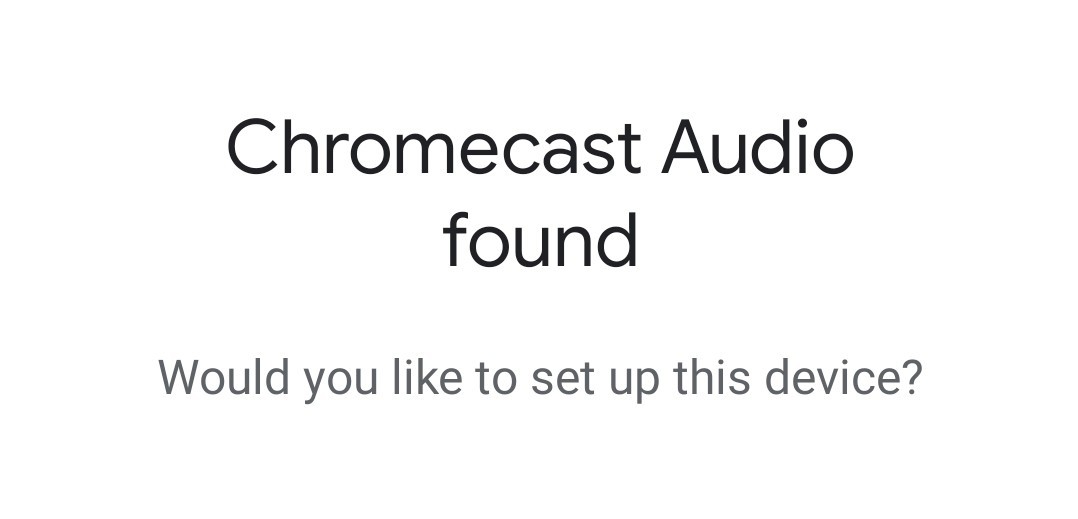
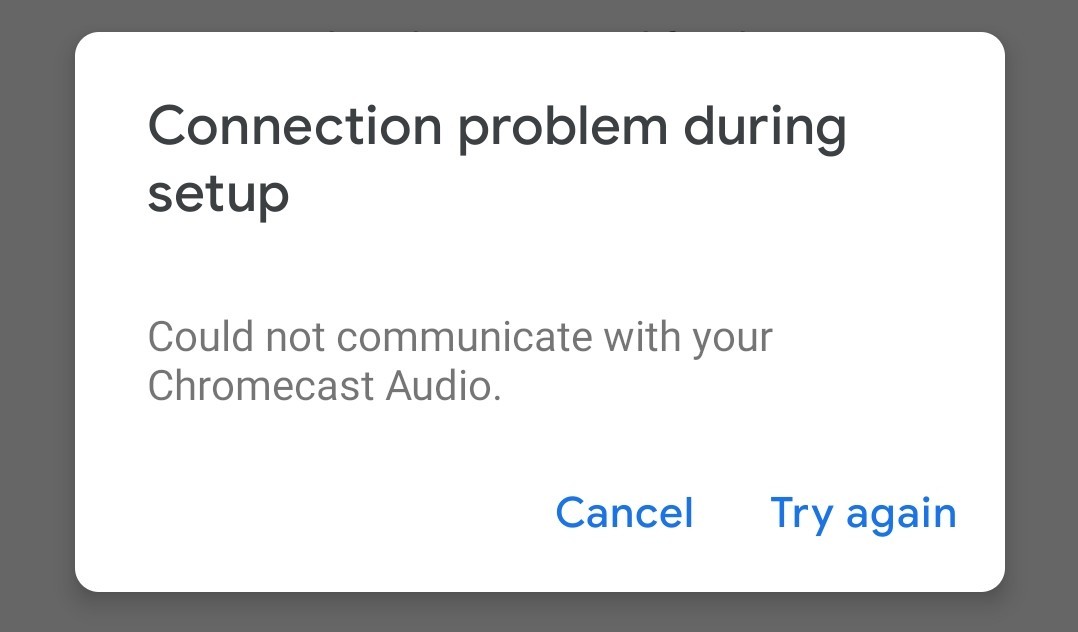
If you factory reset your Chromecast before learning about this issue, you'll likely encounter errors like "Could not communicate with your Chromecast" during setup. Here's how to work around this:
- Factory reset the device once again.
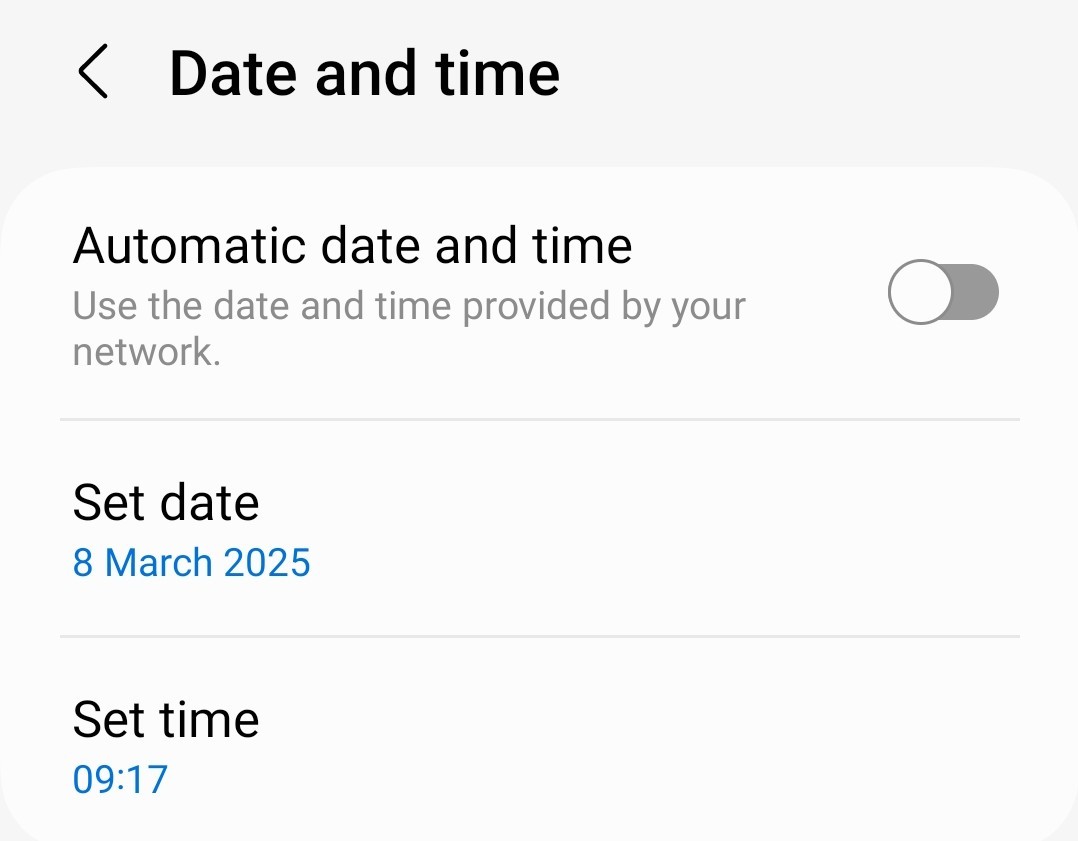
- Change your phone's date to March 8, 2025, or earlier (before the certificate expires) by disabling the "Automatic date and time" in your phone settings and setting the date yourself.
- Remove your no longer active Chromecast from your Google Home app.
- Attempt to set up your Chromecast through the Google Home app

- You may need multiple attempts, but the setup should eventually succeed.

- You may even have to restart the Google Home app, but eventually, it will work.
-
When setting up the WiFi, input the WiFi password directly and do not use this "Use stored password" Google thing.
-
You may have to press "Try again" several times when setting up the WiFi network.
- Press "Not now" on the "Linking your Chromecast Audio"
- Press "Not now" on the "Allow Google Chromecast to use your Network Information"
- After everything is done, restart your Chromecast by powering off and on.
- After setup, your device will reconnect to Google's servers and appear in your Google Home app.
- Restore the correct date and time on your phone.
- Force stop your Google Home app and start it again
- Note that you still won't be able to cast content at this point.
- To enable casting, follow the "How to Fix It" instructions below to bypass device authentication
How to Fix It
While waiting for Google to provide an official fix, here's a simple workaround for Android users:
- Download and install the "Activity Manager" app (you can find it here)
- Launch the app and select "Intent launcher" from the dropdown menu in the top right part of the application screen.
- Tap the edit icon on the right side to the "Action" and paste:
com.google.android.gms.cast.settings.CastSettingsCollapsingDebugActionor (for Android versions 11 or older)com.google.android.gms.cast.settings.CastSettingsDebugAction
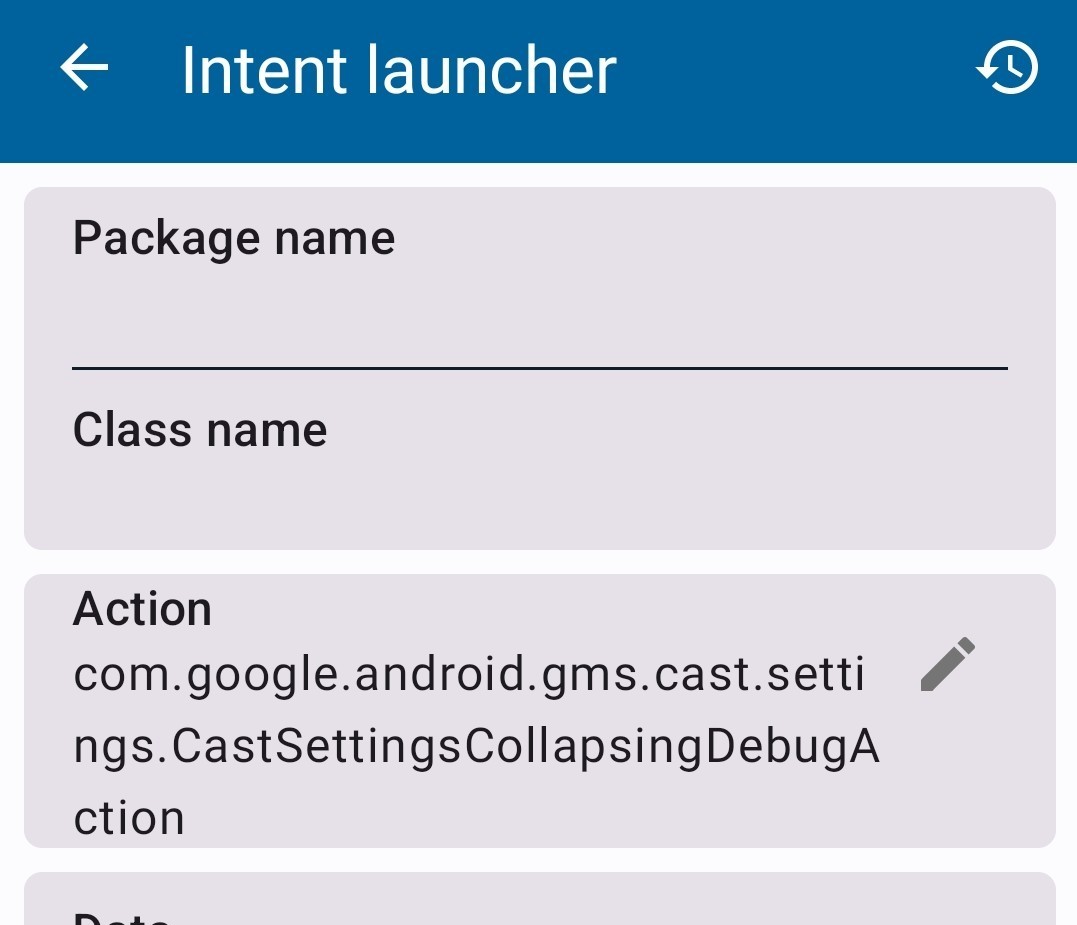
- Leave all other fields blank.
- Press the checkmark at the bottom of the screen.

- In the settings panel that appears, scroll down to "Connection"
- Enable "Bypass Device Auth"
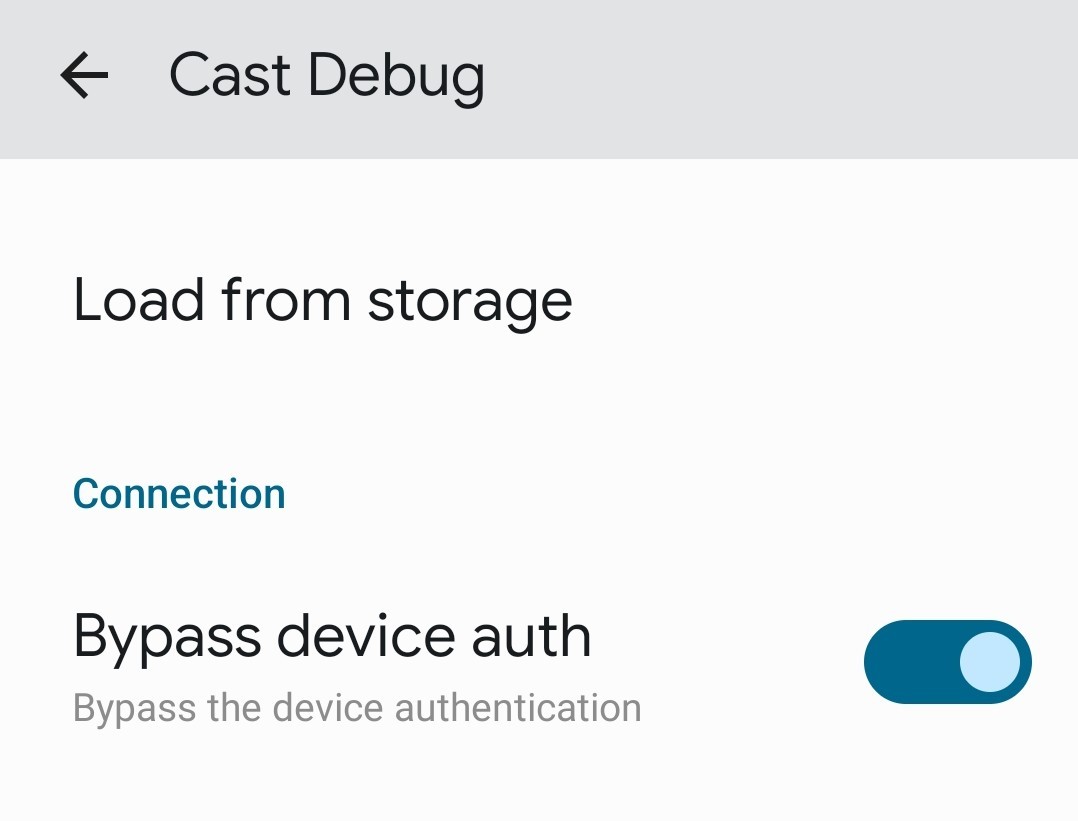
- Connect to your Chromecast and use it.
This workaround should restore casting functionality from your Android device to your Chromecast. Please note, that casting capabilities from specific applications like Spotify may still not work.
The string com.google.android.gms.cast.settings.CastSettingsCollapsingDebugAction is an Android intent action that opens a hidden developer settings menu for Google Cast functionality.
When you use this action through an activity launcher app (like the one suggested in the workaround), it triggers a special debug settings panel specifically for Google Cast services. This panel contains advanced configuration options that aren't normally accessible to regular users through standard interfaces.
You can access the "Bypass Device Auth" toggle option within this hidden menu. When enabled, this setting instructs your Android device to skip the device authentication process that's currently failing due to the expired certificate.
Essentially, this workaround tells your Android device: "Don't verify if this Chromecast is genuine before connecting to it." While this would normally be a security concern (as authentication helps prevent connecting to malicious devices), in this specific situation it's a reasonable temporary solution since you know your Chromecast is legitimate - it just has an expired certificate.
The Technical Research Process
When my Chromecast Audio suddenly stopped working, I approached the problem through several steps:
-
After factory resetting my device with no success, I first suspected a Google Home app issue and tried downgrading to various older versions, testing releases dating back to 2019.
-
When app downgrades proved ineffective, I began investigating system updates on my phone that might have affected Chromecast functionality.
-
I attempted to connect directly to the Chromecast via its setup WiFi network, bypassing the Google Home app entirely to see if I could diagnose or configure it directly which led nowhere.
-
I then pivoted to exploring certificate and networking aspects of the problem, analyzing potential authentication failures.
-
Suspecting a date-related issue (based on my inability to add the device back to Google Home), I experimented with changing my phone's date settings to an earlier time. This allowed me to complete the initial setup process and reconnect my Chromecast with my WiFi network.
I still couldn't play anything, but since I already knew that it was most likely a certificate issue, I started looking for hidden debug options around the GMS (Google Mobile Services) and related services:
- I started by examining Google Mobile Services (GMS) activities and intents related to cast functionality using the ADB shell command:
# Tried a few others prior like Admin, Admin, Casting, etc
adb shell dumpsys package com.google.android.gms | grep Settings | grep Cast- This revealed several interesting activity intents like:
com.google.android.gms.mdm.settings.AdmSettingsActivity
com.google.android.gms.security.settings.AdmSettingsActivity
com.google.android.gms.cast.settings.CastSettingsCollapsingDebugAction
com.google.android.gms.cast.settings.CastSettingsCollapsingAction
com.google.android.gms.cast.settings.CastSettingsDebugAction
com.google.android.gms.cast.settings.CastSettingsAction-
I experimented with various debug activity intents to access hidden developer settings, discovering the two previously mentioned and several others.
-
Through this process, I discovered the "Bypass Device Auth" toggle within these hidden settings panels, allowing the device to skip the failing certificate validation.
-
While testing these actions, I encountered a "Confidential" screen within Google Home that appeared when fuzzing various settings via ADB. This screen suggested additional hidden functionalities within the app, but I did not research it any further. I didn't explore this further because it often crashed Google Home entirely.

This technical exploration revealed that the core issue was related to certificate validation during the authentication process between Android devices and Chromecast hardware.