If your exceptions aren't exceptions but expectations, you're doing it wrong. Here's an example what programmers tend to do:
def validate_status(user)
  case user.status
    when 'active' then return user
    when 'inactive' then fail InactiveUserError
    when 'invalid' then fail InvalidUserError
    when 'deleted' then fail DeletedUserError
    else
      fail UnknownUserStatusError
  end
end

begin
  validate_status(user)
rescue InactiveUserError
  # do something
rescue InvalidUserError
  # do something else
rescue DeletedUserError
  # do something else 2
rescue UnknownUserStatusError
  # do something else 3
end
I've seen also few cases, when exceptions parameters were used to pass objects that the programmer was later on working with!
As you can see, the whole flow of this piece of code is handled with exceptions. In this post I will focus on a performance reason why it is bad, (but if you're interested in how to refactor code like this, at the end of this post you will find some external links about that. That's why I've prepared a simple benchmark
require 'benchmark'

elements = [0, 1]
big_ar = (1..10000).to_a

TIMES = 100000

Benchmark.bmbm do |x|
  x.report('break') do
    TIMES.times do
      elements.each do |i|
        break
      end
    end
  end

  x.report('catch throw') do
    TIMES.times do
      catch(:benchmarking) do
        elements.each do |i|
          throw(:benchmarking)
        end
      end
    end
  end

  x.report('catch throw heavy') do
    TIMES.times do
      catch(:benchmarking) do
        elements.each do |i|
          throw(:benchmarking, big_ar)
        end
      end
    end
  end

  x.report('fail') do
    TIMES.times do
      begin
       elements.each do |i|
         fail StandardError
       end
      rescue
      end
    end
  end

  x.report('fail heavy') do
    TIMES.times do
      begin
       elements.each do |i|
         fail StandardError, big_ar, {}
       end
      rescue
      end
    end
  end

  x.report('raise') do
    TIMES.times do
      begin
       elements.each do |i|
         raise StandardError
       end
      rescue
      end
    end
  end

  x.report('raise heavy') do
    TIMES.times do
      begin
       elements.each do |i|
         raise StandardError, big_ar, {}
       end
      rescue
      end
    end
  end
end
ruby benchmark.rb
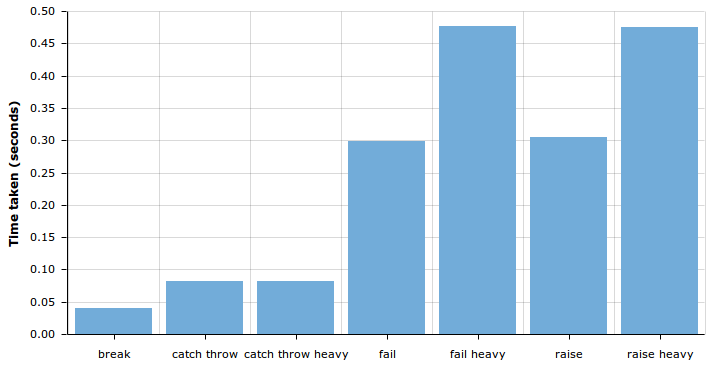
user system total real
break 0.040000 0.000000 0.040000 ( 0.040243)
catch throw 0.080000 0.000000 0.080000 ( 0.082100)
catch throw heavy 0.080000 0.000000 0.080000 ( 0.082422)
fail 0.300000 0.000000 0.300000 ( 0.298863)
fail heavy 0.470000 0.000000 0.470000 ( 0.476829)
raise 0.300000 0.000000 0.300000 ( 0.305635)
raise heavy 0.480000 0.000000 0.480000 ( 0.475377)
And this is how it looks on a chart:
Based on this benchmark we can see following things:
Catch/throw performance is not influenced by the size of passed attribute - it doesn't matter if we pass a huge structure or a simple object
Performance of fail and raise is almost equal, for both normal and heavy case
Fail/raise can be up to 12 times slower than break
Fail/raise can be up to 6 times slower than catch/throw
So, from the performance point of view, handling flow with exceptions can be much more expensive than in other ways. Exceptions are heavy because they are exceptions. They aren't suppose to happen all the time, that's why the implementers of compilers nor the designers of the language focus on their performance.
Refactoring
If you've noticed code like this in your apps, here are some great blog posts on how to fix that: